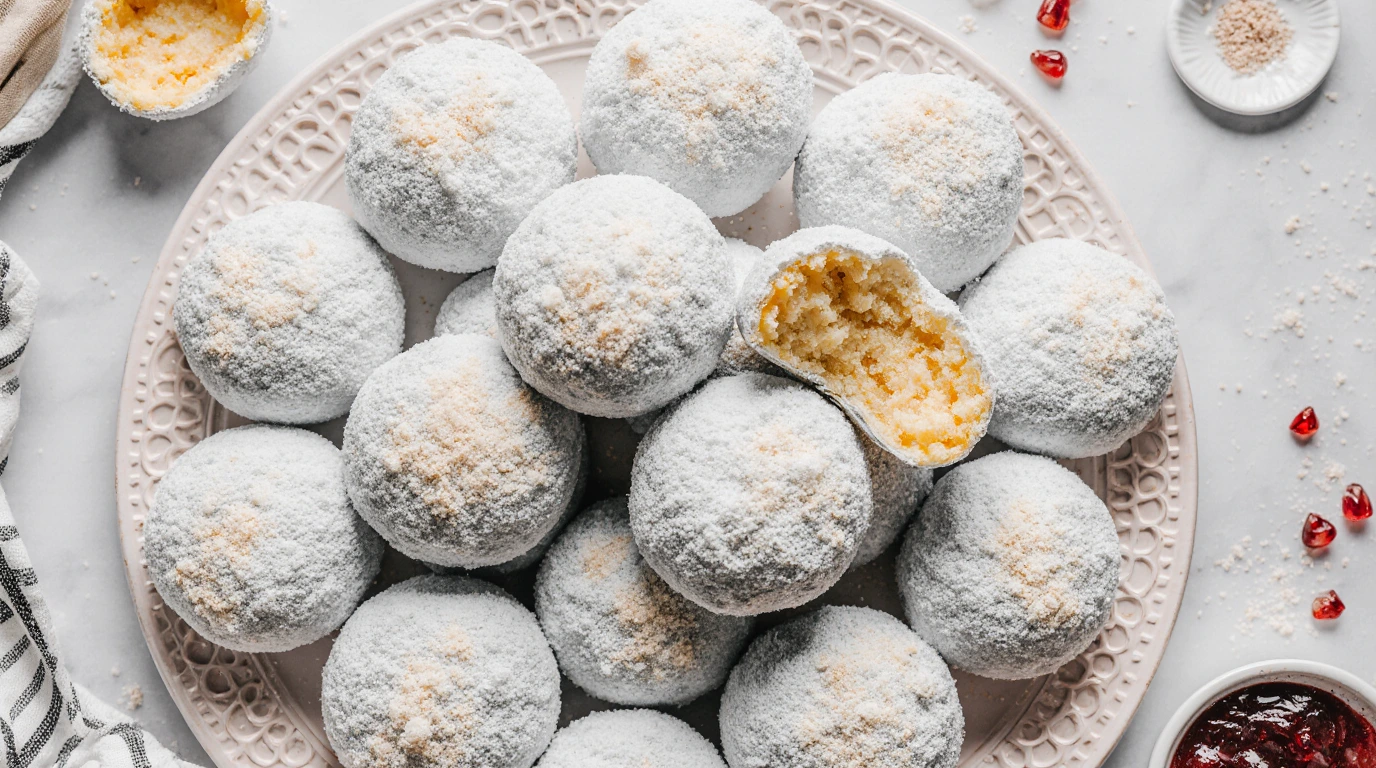
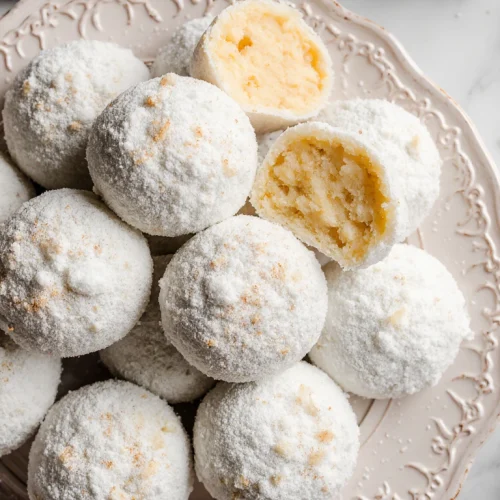
Melt-in-Your-Mouth Holiday Snowball Cookies
Known by many names—Russian Tea Cakes, Mexican Wedding Cakes, or simply Snowball Cookies—this classic treat is a cornerstone of holiday baking worldwide. These cookies are beloved for their incredibly tender, buttery, and crumbly texture, which literally melts in your mouth, leaving behind a delightful powder of sweet confectioners’ sugar. The beauty of this particular recipe lies in its absolute simplicity: the rich, buttery dough comes together in just one mixing bowl using only five primary ingredients, and it requires a minimal chilling time before baking. This eliminates the complexities often found in holiday baking, making the recipe truly foolproof. The cookies are delicious plain, but the optional inclusion of finely chopped and toasted pecans adds a layer of warmth and a subtle crunch that elevates the flavor profile perfectly. They are the ideal cookie for those seeking maximum festive impact with minimum effort.
Why You’ll Love This:
- Effortless and Foolproof: This is a one-bowl, five-ingredient recipe that requires no complicated steps. The quick 30-minute chill time gets you to the oven faster, making this a high-reward holiday cookie with minimal active preparation.
- The Signature Texture: These cookies have a uniquely tender, melt-in-your-mouth consistency due to the high butter content and lack of leavening agents that rely on liquids. This rich, crumbly texture is what defines a true snowball cookie.
- The Double Coating Technique: The secret to achieving the iconic “snowball” appearance is rolling the cookies twice in powdered sugar—once while they are still warm and again after they have cooled completely. This ensures a thick, perfectly set coating that won’t disappear.
- Flavor Customization: While excellent as a simple buttery cookie, the optional addition of finely chopped and toasted pecans introduces a depth of flavor and a lovely textural contrast, allowing for easy customization of the classic recipe.
Perfect Occasion:
Snowball Cookies are inherently festive and are essential for any winter holiday spread. They are perfect for Christmas cookie exchanges, as they hold their shape well and are universally appealing. Their round shape and snowy white appearance make them ideal for holiday gift packaging and tins, as they symbolize winter cheer. They are sturdy enough for transporting yet delicate enough to feel special. Beyond major holidays, these cookies are a welcome treat at any winter gathering or served simply alongside a cozy evening cup of tea or cocoa. They offer a comforting taste of tradition that everyone will appreciate.
Decoration and Serving Tips:
- The Essential Double Roll: Do not skip rolling the cookies a second time once they are fully cool. The first roll adheres to the warm, slightly moist surface, creating a base layer, and the second roll, applied when cool, is what forms the thick, snowy exterior that won’t melt away.
- Toasted Pecans: If including nuts, be sure to toast the pecans briefly in a dry skillet or oven before chopping and adding them to the dough. Toasting enhances their natural oils and flavor, significantly improving the cookie’s final taste.
- Sifting the Coating Sugar: For the absolute smoothest, fluffiest coating, sift the confectioners’ sugar required for the coating into the shallow bowl before rolling. This prevents lumps and ensures an even, delicate layer of “snow.”
- Festive Storage Presentation: Store the finished, fully cooled and coated cookies in a clear glass jar or decorative tin. Their simple, round white shape makes for a beautiful, wintry presentation that is perfect for holiday gifting.
Ingredients:
- For the Cookies: This simple dough requires only five primary ingredients. It starts with softened unsalted butter (1 cup), which must be at room temperature for proper creaming. The dough is sweetened with confectioners’ sugar (3/4 cup), which contributes to the tender texture. Pure vanilla extract (2 tsp) provides the main flavor base. The bulk of the cookie comes from all-purpose flour (2 1/4 cups), which must be spooned and leveled for accuracy. A small amount of salt (1/8 tsp) is necessary to balance the rich butter flavor. Optional: finely chopped and toasted pecans (3/4 cup) add texture and depth.
- For the Coating: The finished cookies receive a generous coating of confectioners’ sugar (1 1/4 cups), which is rolled onto the warm and then cooled cookies to create the signature snowball finish.
Instructions:
Step 1: Mix the Dough
In a large bowl using a handheld mixer or stand mixer fitted with a paddle attachment, beat the softened butter for 1 minute on medium speed until it is smooth and creamy. Add the ¾ cup of confectioners’ sugar and beat on medium-high speed until the mixture is combined and creamy. Scrape down the sides and bottom of the bowl as needed. Next, beat in the vanilla extract on medium-high speed until combined. Switch the mixer to low speed and slowly add the flour and salt. The dough will look dry and crumbly at this stage, and you may not think the flour will fully combine. Once all of the flour is added, turn the mixer up to high speed. The friction and force will bring the dough together into a cohesive ball. Finally, beat in the chopped and toasted pecans, if using.
Step 2: Chill, Roll, and Bake
Cover the cookie dough tightly and chill in the refrigerator for at least 30 minutes and up to 3 days. Chilling the dough firms up the butter and prevents the cookies from spreading. Preheat your oven to 350°F (177°C). Line 2 large baking sheets with parchment paper or silicone baking mats. Pour the 1 ¼ cups of confectioners’ sugar needed for the coating into a shallow bowl. Scoop or roll 1 Tablespoon (20g) of cookie dough per cookie. Roll into a smooth ball and place on the baking sheets, spaced at least 2 inches apart. Bake the cookies until they are lightly golden brown on the bottom edges and just barely browned on top, which should take about 15 minutes. Avoid excessive browning.
Step 3: Double Coat and Cool
Allow the cookies to cool for 5 minutes on the baking sheet. While they are still warm, very gently roll them in the confectioners’ sugar to coat completely. The sugar will melt slightly and become sticky—this is correct. Place the cookies on wire racks to cool completely. Once the cookies have fully cooled to room temperature, roll them in the confectioners’ sugar again. This second roll ensures the sugar coating is thick, white, and perfectly set, creating the definitive “snowball” finish. Once the final sugar coating is applied, the cookies are ready to serve.
Make Ahead Options
Snowball Cookies are excellent candidates for making ahead, which is a significant advantage during the busy holiday season. The cookie dough can be prepared and stored, tightly covered, in the refrigerator for up to 3 days. If the dough has been chilled for 3 or more hours, be sure to let it sit at room temperature for at least 30 minutes before attempting to roll it into balls, as it will be very stiff. Alternatively, you can roll the dough into balls, freeze them raw on a baking sheet, and then transfer the frozen balls to an airtight container for storage for up to 3 months. Bake the frozen balls directly from the freezer, adding 1-2 minutes to the bake time.
Storage Tips for Snowball Cookies
- Room Temperature: Once the cookies have been baked and completely coated in the final layer of powdered sugar, they stay fresh covered at room temperature for up to 1 week. Store them in an airtight container to prevent drying out.
- Refrigeration: Refrigeration is generally not recommended, as the moisture can cause the powdered sugar coating to dissolve, making the cookies sticky. Keep them at room temperature if possible.
- Freezer: Baked, uncoated cookies can be frozen for up to 3 months. Thaw them overnight, and then apply the double coating of sugar as instructed. The raw dough can also be frozen in balls (see Make Ahead Options).
Tips for the Best Snowball Cookies
- Toast Your Nuts: If using pecans or any other nut, toast them in a dry skillet for a few minutes until fragrant before chopping and mixing them into the dough. This vastly improves the flavor depth of the finished cookie.
- Do Not Substitute Butter: The high-fat content of butter is crucial for the melt-in-your-mouth texture. Do not substitute with margarine or shortening. Ensure the butter is fully softened to room temperature for proper mixing.
- Double Coat the Sugar: This step is non-negotiable for the classic “snowball” look. The first coat adheres to the warm cookie, and the second coat adheres to the cool, slightly sticky base layer, giving you the thick, beautiful white finish.
- Chill Time is Mandatory: Although only 30 minutes minimum, chilling the dough is essential to prevent the cookies from flattening and spreading too much during baking.
Snowball Cookies Variations & Substitutions:
- Nut Alternatives: Replace the pecans with an equal amount of finely chopped and toasted walnuts or almonds.
- Flavor Extracts: Introduce new flavors by adding a ¼ teaspoon of almond extract or peppermint extract along with the vanilla. Almond pairs particularly well with the pecans.
- Chocolate Chip Snowballs: For a chocolate twist, fold in ½ cup of mini chocolate chips into the dough before chilling.
- Citrus Zest: Add 1 tablespoon of finely grated orange or lemon zest when creaming the butter and sugar for a bright, fresh flavor contrast.
What to Serve with Snowball Cookies:
The buttery, sweet flavor of Snowball Cookies is best complemented by warm, slightly acidic, or bitter beverages. Serve them alongside a mug of strong, black coffee, a rich espresso, or a spiced tea. For a non-alcoholic pairing, they are delightful with a classic cup of hot cocoa or a glass of chilled milk. Their tender texture also makes them a pleasant accompaniment to holiday punches that feature citrus or cranberry notes.
Snowball Cookies FAQs:
- Why did the sugar coating disappear after cooling?
The sugar coating disappeared because you likely skipped the second roll. The sugar from the first roll (on the warm cookie) partially dissolves into the fat as the cookie cools. The second roll, applied when the cookie is fully cooled, is what creates the final, permanent white coating. - Can I use cold butter in this recipe?
It is highly recommended not to use cold butter. The dough relies on softened, room-temperature butter to cream properly with the sugar and come together with the flour without overmixing. Using cold butter will result in a tough, crumbly dough that is difficult to handle. - What makes these cookies “melt-in-your-mouth”?
The incredibly tender texture is due to the high fat-to-flour ratio (lots of butter) and the use of confectioners’ sugar instead of granulated sugar in the dough. Confectioners’ sugar dissolves more easily, contributing to a lighter, less dense, and more crumbly final texture. - Why do I need to add salt to the coating sugar?
Although the recipe only calls for salt in the dough, some recipes recommend adding a tiny pinch of salt to the final powdered sugar coating. This helps cut through the intense sweetness of the sugar, creating a more balanced flavor experience. - Can I make these cookies without a mixer?
Yes, you can. You will need a sturdy whisk and spatula. You will need to cream the butter and sugar thoroughly by hand, which will take longer than with a mixer, and you will need to use your hands to fully incorporate the flour at the end, as the dough is stiff.
Melt-in-Your-Mouth Holiday Snowball Cookies
Ingredients
For the Cookies
- 1 cup 16 Tbsp; 226g unsalted butter, softened
- 3/4 cup 90g confectioners’ sugar
- 2 teaspoons pure vanilla extract
- 2 1/4 cups 281g all-purpose flour
- 1/8 teaspoon salt
- Optional: 3/4 cup 100g finely chopped and toasted pecans
For the Coating
- 1 1/4 cups 150g confectioners’ sugar
Instructions
- Make Dough: Beat softened butter until creamy. Add the 3/4 cup sugar and vanilla; beat until combined. Slowly add flour and salt. Beat until the dough comes together. Beat in pecans, if using.
- Chill Dough: Cover dough and chill in the refrigerator for at least 30 minutes.
- Roll and Bake: Preheat oven to 350°F. Roll 1 Tablespoon of dough per cookie into a ball and place on lined baking sheets. Bake for about 15 minutes until lightly browned on the bottom edges.
- First Coat: Cool cookies for 5 minutes on the sheet, then gently roll them in the coating sugar while they are still warm.
- Second Coat: Place cookies on a wire rack to cool completely. Once fully cool, roll in the confectioners’ sugar again for a thick, white coating.
Notes
- Toasting Nuts: Toast the pecans before chopping for the best flavor.
- Double Coating: The second roll in the sugar is essential for achieving the thick, signature white coating that won’t melt away.
- Storage: Store cookies covered at room temperature for up to 1 week.