
Mini Apple Pies Recipe
The Ultimate Guide to Spectacular Mini Apple Pies: A Professional Bakery-Style Approach
There is something inherently comforting about the aroma of cinnamon and simmered apples wafting through a home. While a full-sized apple pie is a masterpiece in its own right, Mini Apple Pies offer a sophisticated and charming alternative that elevates the traditional dessert experience. By packing the classic, spiced flavors of autumn into individual, hand-held servings, you create a treat that is as practical as it is beautiful.
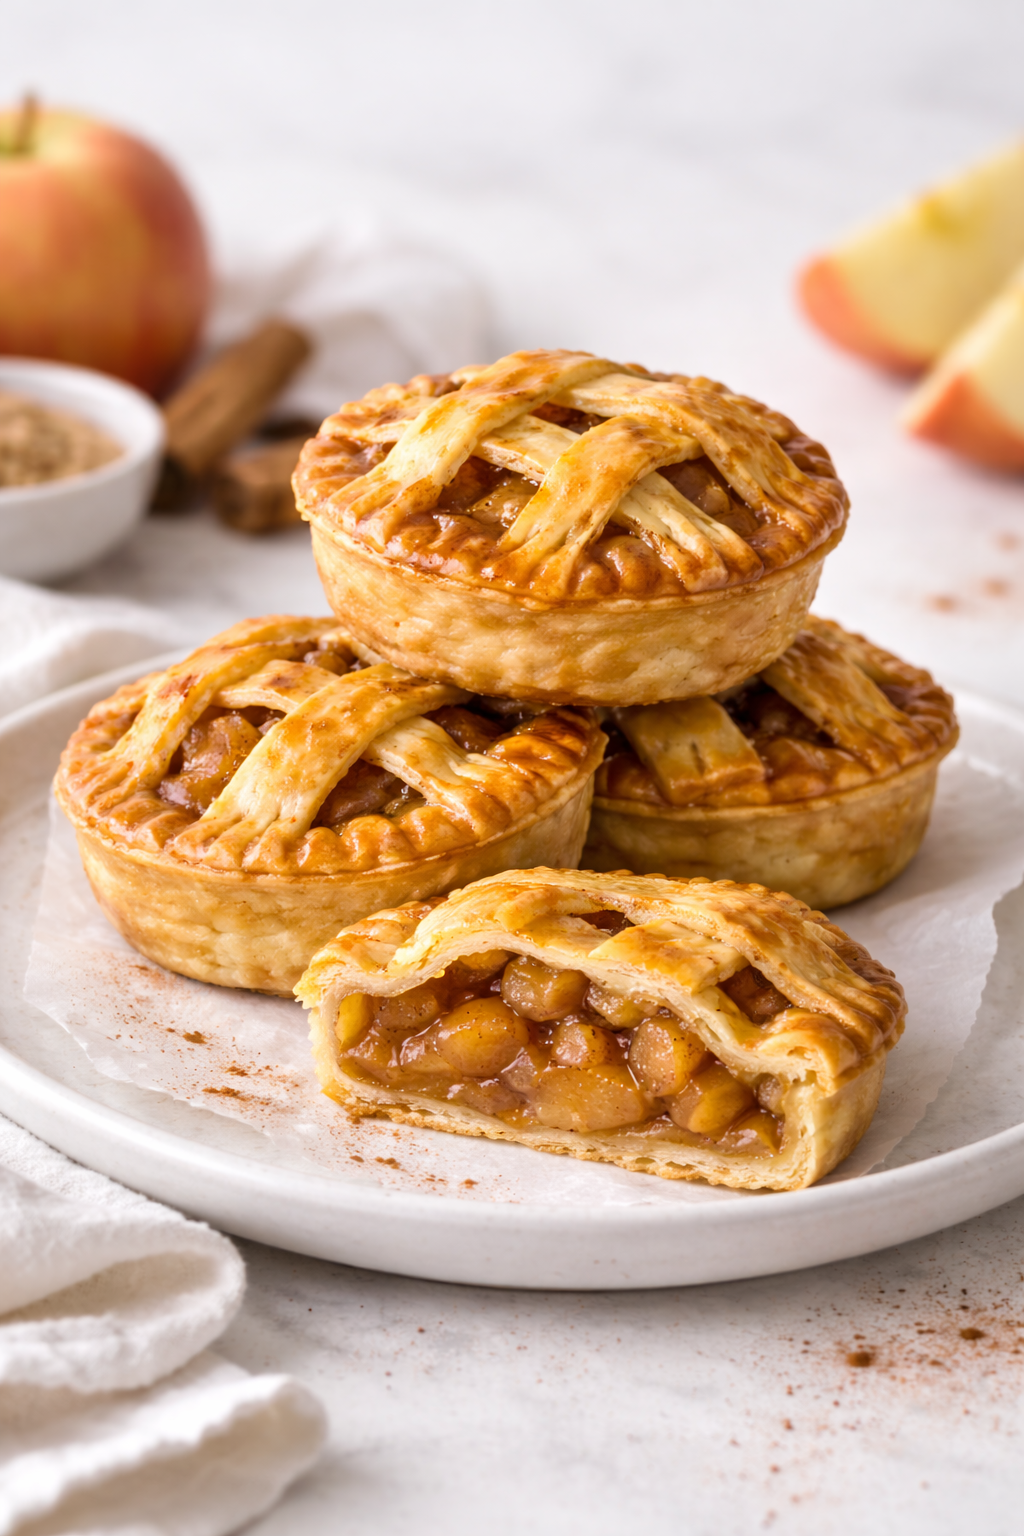
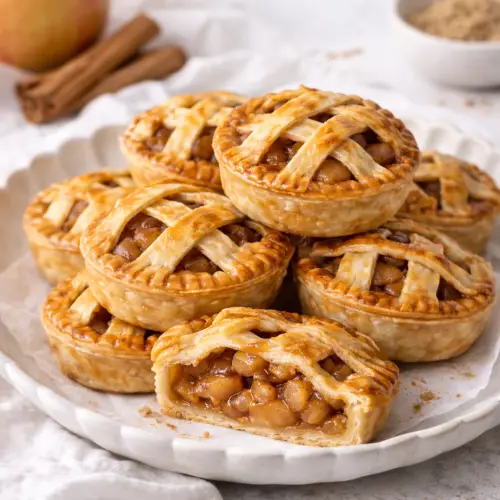
These mini pies feature a meticulously spiced apple filling encased in a buttery, flaky shortcrust pastry and are finished with an elegant lattice top. They are the perfect solution for modern gatherings, providing a convenient way to enjoy a favorite dessert without the mess of slicing and serving a large pie. Whether you are an experienced pastry chef or a home baker looking to sharpen your skills, this guide will provide the technical depth and step-by-step precision needed to create bakery-quality results every time.
The Science of the Perfect Apple Filling
The heart of any great apple pie—regardless of size—is the filling. Achieving the correct consistency is a matter of food chemistry. In this recipe, we use a combination of brown sugar, salted butter, and a cornflour slurry to create a rich, stable sauce that binds the apple cubes together.
When apples are simmered with sugar and butter, they release their natural juices. Without a thickening agent, these juices would turn the bottom of your pastry soggy. By introducing cornflour (cornstarch), we create a “gel” that captures that moisture. It is crucial to simmer the apples before they go into the pastry. Since mini pies bake much faster than large pies (only 20-25 minutes), raw apples would likely remain crunchy if not pre-softened on the stove. This extra step ensures a “melt-in-your-mouth” texture that contrasts perfectly with the crisp shortcrust.
Detailed Ingredient Breakdown
To achieve a balanced flavor profile, every ingredient in the filling and crust serves a specific structural or aromatic purpose.
The Apple Base
- 2 Large Apples: For mini pies, a firm, tart apple like a Granny Smith or a Honeycrisp is ideal. They hold their shape during the simmering process and provide a sharp contrast to the sweet brown sugar.
- 2 tbsp Lemon Juice: The acidity in the lemon juice serves two functions: it prevents the chopped apples from oxidizing (turning brown) and it provides a “bright” high note that cuts through the richness of the butter and sugar.
The Spice Profile
- 50g Brown Sugar: We choose brown sugar over white for its molasses content, which gives the filling a deep, caramelized flavor.
- Cinnamon and Nutmeg: This is the classic “apple pie spice” duo. Cinnamon provides the warmth, while a touch of nutmeg adds a woody, slightly peppery depth that makes the apple flavor pop.
- 40g Salted Butter: The salt in the butter acts as a flavor enhancer, balancing the sugar and adding a silky mouthfeel to the sauce.
The Pastry and Glaze
- 2 Sheets Frozen Shortcrust Pastry: Using high-quality frozen shortcrust is a fantastic time-saver. It provides a consistent, flaky result that is sturdy enough to be handled in miniature form.
- 1 Egg: Whisked for an egg wash. This is the secret to that professional, high-gloss golden finish. Without the egg, the pastry often looks pale and matte even when fully cooked.
Step-by-Step: Mastering the Mini Lattice Technique
1. Preparing the Spiced Compote
Begin by peeling and cubing your apples into small, uniform pieces (about 1cm). In a saucepan, combine the apples with the butter, brown sugar, spices, and lemon juice. Simmer over medium heat for about 5–8 minutes. You want the apples to be “al dente”—softened but not mushy.
Create your slurry by mixing the cornflour with cold water until smooth. Pour this into the bubbling pan and stir constantly. You will see the liquid turn from cloudy to clear and thick almost instantly. Remove from the heat and let it cool completely. Placing hot filling onto cold pastry will melt the fats in the dough and ruin your flaky layers.
2. Precision Cutting
Preheat your oven to 180°C (356°F). Thaw your pastry sheets just enough so they are pliable but still cold. Using a round cookie cutter (roughly 8–10cm in diameter), cut out 9 circles for your bases.
From the second sheet, use a sharp knife or a pastry wheel to cut strips exactly 1.5cm wide. Uniformity here is what makes the pies look professional.
3. Assembly and the Lattice “Cheat”
Place about a tablespoon of the cooled filling in the center of each round. Do not overfill, or the juice will bubble out and break the seal.
To create the lattice, place two strips horizontally across the pie. Then, weave two strips vertically over and under. Because these are mini, you don’t necessarily need to do a full traditional weave—simply crossing them creates a beautiful effect. Trim the excess and use a fork to crimp the edges firmly. This “docking” process ensures the top and bottom layers of pastry are fused together.
4. The Golden Bake
Arrange the pies on a baking tray lined with parchment paper. Brush each one generously with the whisked egg. Bake for 20–25 minutes. You are looking for a deep golden-brown hue and a pastry that feels firm to the touch.
Frequently Asked Questions (Q&A)
Can I use Puff Pastry instead of Shortcrust? You can, but the result will be very different. Puff pastry will rise significantly and may “lift” the lattice off the apples. Shortcrust is the traditional choice for its “short,” crumbly texture and structural strength.
Why is my filling leaking out? This usually happens if the cornflour slurry wasn’t cooked long enough to thicken, or if the edges of the pastry weren’t crimped tightly enough with the fork. Ensure your filling is thick and jam-like before it goes into the pie.
Can I make these ahead of time? Yes! You can assemble the pies and keep them in the refrigerator (unbaked) for up to 24 hours. Alternatively, baked pies can be frozen for up to a month. Simply reheat them in a 180°C oven for 10 minutes to restore the crispness of the pastry.
What is the best way to serve these? For a high-end presentation, serve them slightly warm with a small scoop of premium vanilla bean ice cream or a drizzle of salted caramel sauce.
Tips for Success
- Temperature is Key: If your pastry gets too warm and soft while you are working, pop it back in the fridge for 10 minutes. Cold pastry equals a flakier crust.
- The Apple Cut: Make sure the apple cubes are small. If the chunks are too big, they will create large air gaps under your lattice, causing the crust to sink.
- The Glaze: For an extra “crunchy” top, sprinkle a little demerara sugar or granulated sugar over the egg wash before baking.
Hand-Held Mini Lattice Apple Pies
Ingredients
The Filling:
- 2 Large apples peeled and finely diced
- 40 g Salted butter
- 50 g Brown sugar
- 1-2 tsp Ground cinnamon
- 1/4 tsp Ground nutmeg
- 2 tbsp Fresh lemon juice
- 1/2 tsp Cornflour cornstarch
- 3 tsp Cold water for slurry
The Pastry:
- 2 Sheets Frozen shortcrust pastry thawed but cold
- 1 Large egg whisked (for glazing)
Instructions
- Simmer Filling: In a medium saucepan, combine chopped apples, butter, brown sugar, cinnamon, nutmeg, and lemon juice. Simmer over medium heat until apples are tender.
- Thicken: Mix cornflour and cold water in a small cup. Stir into the apple mixture until thickened. Remove from heat and allow to cool completely.
- Prepare Oven: Preheat your oven to 180°C (356°F) and line a baking sheet with parchment paper.
- Cut Pastry: Cut 9 large rounds from the first pastry sheet. Cut the second sheet into 1.5cm wide strips for the lattice.
- Assemble: Place 1 tbsp of apple filling on each round. Lay the strips across in a lattice pattern (2 parallel, 2 perpendicular).
- Seal: Trim excess strips and use a fork to crimp and seal the edges of each pie.
- Egg Wash: Brush the lattice and edges of the pies with the whisked egg.
- Bake: Bake for 20–25 minutes until the pastry is golden brown and crisp.
- Serve: Let cool slightly on a wire rack before serving.
Notes
- Cold Pastry: If the dough becomes too sticky to handle, chill it in the freezer for 5 minutes.
- Consistency: Ensure the apple filling is thick; if it’s too runny, add a tiny bit more cornflour slurry.
- Storage: Store in an airtight container for up to 3 days. Reheat in the oven to maintain the texture.