

Red Velvet Cake Pops with White Chocolate Swirl — Bite-Sized Bakery Magic
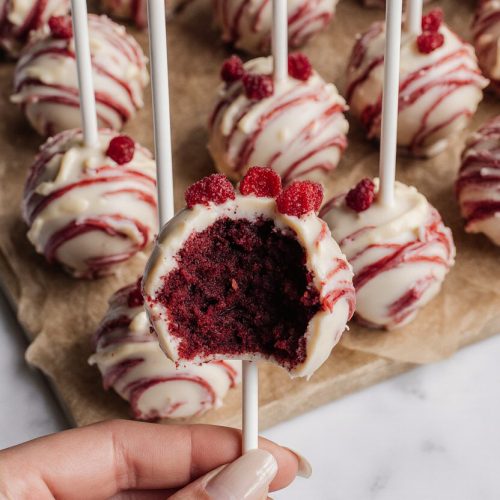
There’s something so undeniably charming about cake pops. They’re cute, portable, easy to eat, and incredibly customizable — the ideal dessert for parties, holidays, or simply treating yourself. And when you make them red velvet-style with a creamy white chocolate shell? That’s a recipe for serious indulgence. These Red Velvet Cake Pops with White Chocolate Swirl combine everything we love about red velvet cake — the rich cocoa flavor, the soft and moist crumb, and the tangy hint of cream cheese — into a single pop you can hold in your hand.
Each bite is velvety and sweet with a perfectly fudgy texture, surrounded by a crisp outer layer of white chocolate drizzle. They look like something straight out of a boutique bakery window, but are surprisingly simple to make at home. Whether you’re serving them at a wedding shower, wrapping them for gifts, or just sneaking a few out of the fridge after dinner, they’re bound to steal the show.
Why You’ll Love This Recipe
- Rich and Moist: The red velvet cake base is soft, flavorful, and fudgy thanks to a blend of cocoa and cream cheese frosting.
- Eye-Catching Design: The swirl of white chocolate looks elegant and playful — perfect for parties or gifting.
- Portable and Mess-Free: Each pop is on a stick, making them easy to serve and eat without utensils or crumbs.
- Make-Ahead Friendly: These store beautifully in the fridge or freezer, so you can prep them ahead for stress-free hosting.
- Customizable: Use different chocolates, coatings, or sprinkles to match any theme, season, or occasion.
- No Fork Needed: Great for dessert tables, school functions, and bite-sized indulgence.
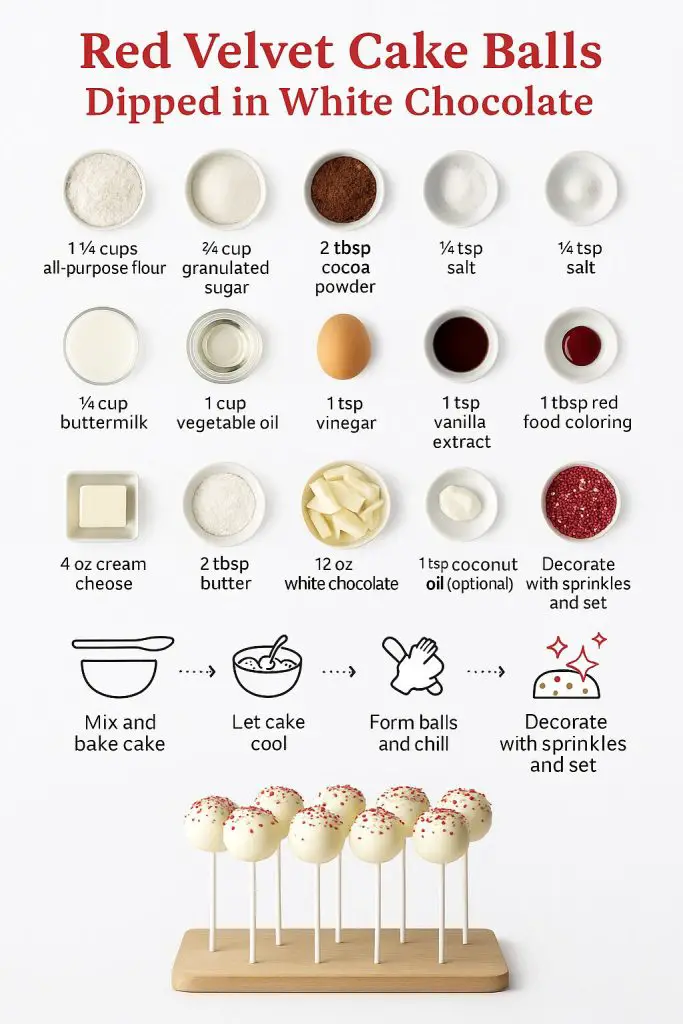
Ingredients You’ll Need (and Why)
For the Red Velvet Cake Base:
- All-purpose flour: Gives the cake its soft but sturdy structure.
- Granulated sugar: Sweetens the cake and balances the cocoa.
- Unsweetened cocoa powder: Adds a deep cocoa flavor without overpowering the red velvet taste.
- Baking soda and vinegar: These work together to create a light, airy crumb by reacting and leavening the batter.
- Buttermilk: Adds moisture and that essential tang that makes red velvet cake so unique.
- Eggs: Help bind the cake and create a rich texture.
- Vegetable oil: Keeps the crumb moist and fudgy.
- Vanilla extract: Enhances the flavor of both the cocoa and the tangy buttermilk.
- Red food coloring: Gives that iconic, vibrant red hue to the cake.
For the Cream Cheese Frosting:
- Cream cheese: Adds tangy creaminess and helps bind the cake crumbs into dough.
- Butter: Adds richness and smooth texture.
- Powdered sugar: Sweetens and thickens the frosting for the perfect consistency.
- Vanilla extract: For warm background flavor.
For the Coating:
- White chocolate or white candy melts: Create a smooth, creamy outer shell that contrasts beautifully with the red interior.
- Coconut oil or shortening (optional): Thins the coating for easier dipping.
- Sprinkles or drizzle (optional): For decoration or added flair.
How to Make Red Velvet Cake Pops
Step 1: Bake the Cake
Preheat your oven to 350°F (175°C) and grease a 9×13-inch pan. In a large bowl, whisk together the flour, sugar, cocoa, baking soda, and salt.
In another bowl, mix buttermilk, eggs, oil, vanilla, vinegar, and red food coloring. Pour the wet ingredients into the dry and mix just until combined.
Bake for 30–35 minutes or until a toothpick inserted comes out clean. Let the cake cool completely.
Step 2: Make the Frosting
While the cake cools, beat the cream cheese and butter until smooth. Add the powdered sugar and vanilla, and mix until light and fluffy.
This frosting should be soft enough to blend into cake crumbs but not runny.
Step 3: Form the Cake Balls
Once cooled, crumble the cake into fine crumbs using clean hands or a fork. Add a few spoonfuls of frosting at a time and mix until the mixture holds together like a dough — you’ll likely need about ½ to ¾ cup of frosting.
Scoop and roll into smooth 1 to 1½-inch balls. Place them on a parchment-lined tray and refrigerate for at least 1 hour (or freeze for 20–30 minutes) to firm up.
Step 4: Insert Sticks
Dip the tip of each lollipop stick into melted white chocolate, then insert halfway into each cake ball. This helps anchor the stick as the chocolate sets.
Place back in the fridge for 15 minutes to solidify.
Step 5: Coat in Chocolate
Melt the white chocolate and stir in a small spoonful of coconut oil or shortening if needed to thin.
Dip each cake pop gently, turning to coat fully. Tap off excess chocolate and swirl lightly for texture. While still wet, add sprinkles or edible glitter if desired.
Stick upright into a block of foam or a cake pop stand and allow to set fully at room temperature or in the fridge.
Tips for Perfect Cake Pops
- Don’t overmix the dough: Add frosting slowly and stop when the mixture just comes together — too much makes them greasy.
- Chill, chill, chill: Cold cake balls are easier to dip and hold their shape better.
- Use high-quality chocolate: It melts smoother, sets cleaner, and tastes better.
- Thin coating = clean look: Add a bit of oil to your chocolate if it’s too thick for dipping.
- Let them set completely: Rushing this step can lead to cracks or smudges in the coating.
Storage Tips
At Room Temperature:
Keep cake pops in a sealed container for up to 2 days (if not using perishable frosting).
In the Fridge:
Best stored refrigerated in a covered container for up to 5 days. Let sit at room temp for 15 minutes before serving.
In the Freezer:
Wrap each pop in plastic wrap, place in a freezer-safe bag or container, and freeze for up to 2 months. Thaw in the fridge overnight before serving.
When to Serve These
Red velvet cake pops are gorgeous on:
- Valentine’s Day
- Christmas dessert tables
- Wedding or baby showers
- Birthday party favor bags
- Graduation or bridal dessert bars
- Bake sales and gifts
They’re fun, festive, and always look like they took more effort than they did — which is exactly what we want from a make-ahead dessert.
Enjoy!
These Red Velvet Cake Pops with White Chocolate Swirl are a true crowd-pleaser. With their striking color, rich flavor, and creamy coating, they offer the perfect bite of indulgence in a fun, portable package. Whether you’re planning a celebration or simply craving something sweet, these pops hit the spot — one joyful bite at a time.
Red Velvet Cake Balls Dipped in White Chocolate
Ingredients
Red Velvet Cake:
- 1 ¼ cups all-purpose flour
- ¾ cup granulated sugar
- 2 tbsp cocoa powder
- ½ tsp baking soda
- ¼ tsp salt
- ½ cup buttermilk
- ½ cup vegetable oil
- 1 large egg
- 1 tsp vanilla extract
- 1 tsp vinegar
- 1 tbsp red food coloring
Cream Cheese Frosting:
- 4 oz cream cheese softened
- 2 tbsp butter softened
- 1 cup powdered sugar
- ½ tsp vanilla extract
Coating:
- 12 oz white chocolate chips or candy melts
- 1 tbsp coconut oil optional
- Sprinkles or glitter optional
Instructions
- Bake cake: Mix dry and wet ingredients separately. Combine and bake at 350°F for 30–35 mins. Cool fully.
- Make frosting: Beat cream cheese, butter, powdered sugar, and vanilla until smooth.
- Crumble cake, mix in frosting to form dough. Scoop and roll into balls. Chill.
- Dip sticks in melted chocolate and insert into chilled cake balls. Chill again.
- Dip each pop in melted chocolate. Swirl and decorate. Let set.
- Store chilled and enjoy!
Notes
- For extra tang, add a pinch of lemon zest to the coating.
- These freeze beautifully — make ahead and thaw as needed.