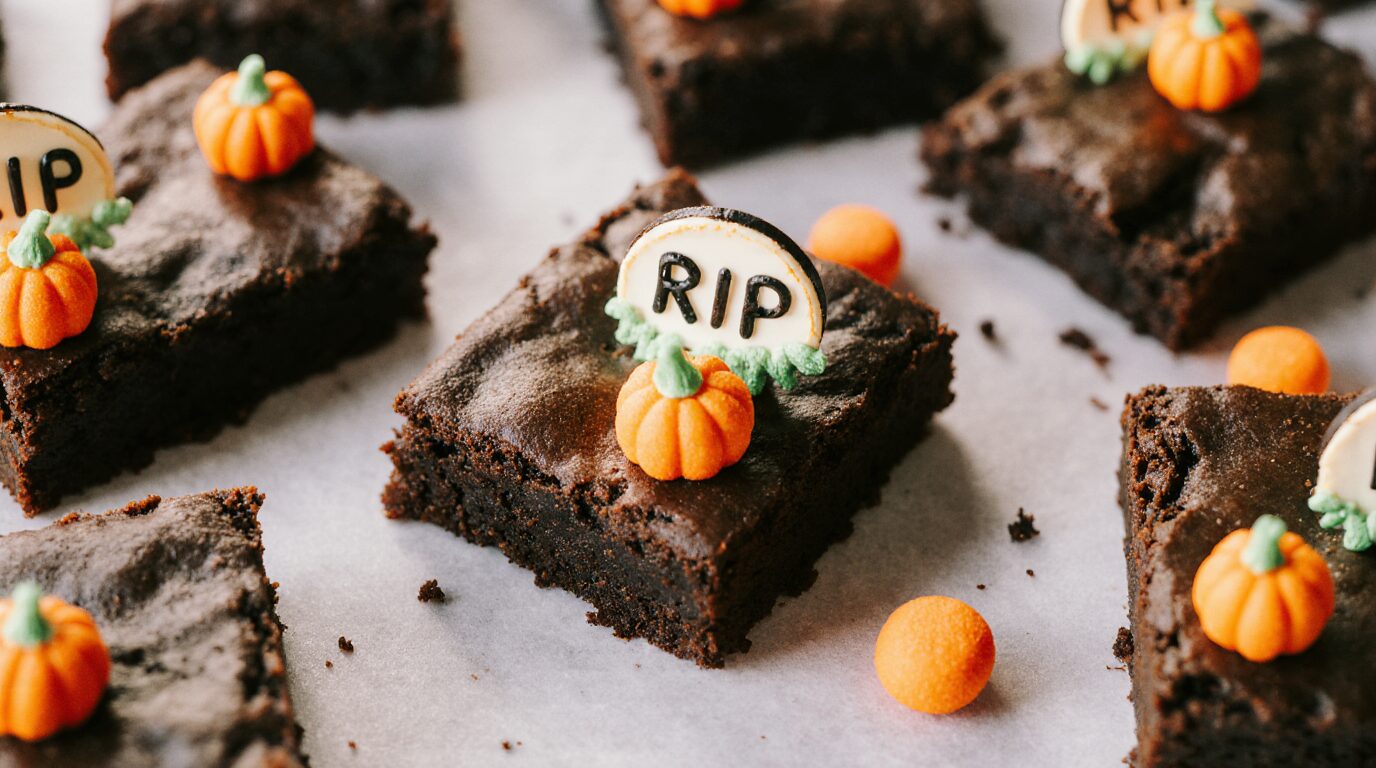
Spooky Graveyard Halloween Brownies
Get ready to create a dessert that is as thrilling as it is delicious. These Graveyard Halloween Brownies are a theatrical and fun way to celebrate the spooky season, with a dramatic visual that is guaranteed to be the centerpiece of any party. This recipe combines a rich, decadent brownie with a simple green buttercream frosting and some creative decorations. The real showstopper, however, is the edible “headstones” and the candy pumpkins that make these brownies look both spooky and spectacular. Despite their impressive and intricate appearance, all the elements are surprisingly simple to make. This is a dessert that is not only a delight to eat but also a creative and memorable project for all ages. So get ready to bring a touch of playful horror to your dessert table with these delicious and fun treats.
Why You’ll Love This:
- A Stunning Visual: These brownies have a dramatic and creative visual that is perfect for a themed event. The combination of the rich, dark brownie, the bright green “grass,” and the cookie headstones creates a dessert that is both beautiful and spooky.
- Layered Flavors and Textures: The recipe is a masterpiece of layered flavors and textures. You get the deep, chocolatey taste of the brownie, the creamy sweetness of the buttercream, and the satisfying crunch of the cookie headstones. Every single bite offers a new and exciting sensory experience.
- Perfect for Making Ahead: This recipe is a fantastic make-ahead dessert, which makes it perfect for a busy party day. The brownies and the frosting can all be prepared a day or two in advance, allowing you to focus on decorating on the day of your event.
- A Fun and Memorable Treat: These brownies are a creative and memorable project that is perfect for a weekend afternoon. The process of decorating the brownies is fun and unique, and the result is a dessert that will have everyone talking.
Perfect Occasion:
These Graveyard Halloween Brownies are the perfect centerpiece for any Halloween party, horror movie night, or themed event. Their striking visual and delicious flavors make them a standout dessert that will impress every guest. The creative and interactive nature of the decorations also makes them a fun project for a themed birthday party or a festive get-together with friends. They are a wonderful way to celebrate the spooky season, and their homemade charm and delicious flavors ensure they will be a beloved and memorable part of the meal. No matter the event, these brownies are sure to be the star of the show.
Serving and Decoration Tips:
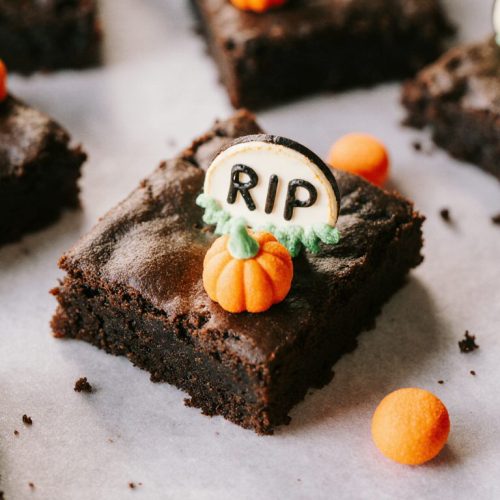
- A Simple Headstone: The “headstones” are the key decorative element that creates the graveyard effect. You can use a black decorating gel to write the letters “R.I.P.” on the top of each cookie, and then press them into the brownies.
- Green Buttercream “Grass”: For a simple and beautiful garnish, you can use a small amount of green buttercream frosting to create a patch of “grass” near the headstone. You can also use a fork to create a textured, grass-like effect.
- A Sprinkle of Spices: For an elegant and simple garnish, you can sprinkle a light dusting of cocoa powder or powdered sugar over the brownies. This adds a pop of color and signals the rich chocolatey flavor within.
- Chopped Cookies: For a realistic “dirt” effect, you can crumble some extra cookies or brownies and sprinkle them around the headstones. This will add a fun and creative touch that pairs perfectly with the spooky theme.
Ingredients:
- For the Brownies: The foundation of this dessert is a rich and decadent chocolate brownie. The recipe calls for a prepared brownie batter for an 8-inch pan, which can be a favorite boxed mix or a from-scratch recipe.
- For the Green Buttercream Frosting: This is a simple and fluffy frosting that provides a beautiful, soft base for the dramatic decorations. It is made with powdered sugar (1 cup), butter (¼ cup), a touch of milk (2 tsp) for consistency, and a few drops of green food coloring to create the “grass” effect.
- For the Decorations: The key decorative elements that bring this dessert to life. We use long, rectangular chocolate-filled cookies (12), which are perfect for creating the headstones. A black decorating gel is used to write the letters “R.I.P.” on top of each cookie. And finally, candy pumpkins (12) are used to add a fun, festive touch to the graveyard scene.
Instructions:
Step 1: Bake the Brownies
First, prep your pan by lining an 8-inch baking pan with parchment paper, leaving a little bit of overhang on the sides. This will make it easier to pull the brownies out of the pan once they are done. Pour your prepared brownie batter into the pan and smooth it into an even layer. Bake the brownies according to the recipe instructions for your specific batter. Once baked, allow the brownies to cool completely in the pan before you begin decorating. This is a crucial step, as warm brownies will cause the frosting to melt.
Step 2: Cut the Brownies and Make the Frosting
Once the brownies are completely cool, pull up on the parchment paper and transfer the brownies to a flat surface. Use a sharp knife to cut the brownies into 12 even rectangles. You can cut mine into a 4×3 grid to make 12 rectangle brownies. In a medium bowl, mix all of the frosting ingredients together. Use an electric mixer to mix for 2 minutes until the frosting is light and fluffy. You can add a little more powdered sugar to make the mixture thicker, or another dash of milk to make it thinner, as needed. Mix in a few drops of green food coloring until you reach your desired shade of green. Set the frosting aside.
Step 3: Decorate the Brownies
Use the black decorating gel to write the letters “R.I.P.” on the top of each long, rectangular cookie. You can also cut the very bottom edge off of the cookies to make the “headstones” a little shorter. Gently press each cookie into the top of the brownie, as if it were a grave headstone. Use a spoon to dollop a little green frosting near the headstone and create a patch of “grass.” Place a candy pumpkin on top of the frosting. Repeat this process until all of your brownies are decorated.
Make Ahead Options
This recipe is a fantastic make-ahead dessert, which makes it perfect for a busy party day. You can bake the brownies up to two days in advance and store them in an airtight container at room temperature. The buttercream can also be made a day in advance and stored in the fridge. When you’re ready to assemble, just give the buttercream a quick whip to make sure it’s light and fluffy before you use it. For the freshest look, it’s best to decorate the brownies on the day you plan to serve them, but the finished product will hold up beautifully for a day or two in the fridge.
Storage Tips for Graveyard Halloween Brownies
- Room Temperature: Brownies, once baked and cooled, can be stored in an airtight container at room temperature for up to 2 days.
- Refrigerator: Once the brownies are frosted, they should be stored in an airtight container in the refrigerator. They will stay fresh and delicious for up to a week. The airtight container will keep the brownies from drying out and prevent them from absorbing any other odors from the fridge.
- Freezer: For longer storage, you can freeze the undecorated brownies. Once they have cooled completely, wrap them tightly in plastic wrap and place them in a freezer-safe bag. They can be frozen for up to 3 months. When you’re ready to enjoy, thaw them at room temperature and then make the fresh frosting just before serving.
Tips for the Best Graveyard Brownies
- Cool Completely: This is a crucial tip for a perfectly decorated brownie. Do not frost or decorate the brownies until they have cooled completely. If they are even slightly warm, the buttercream will melt and slide off, creating a mess.
- Use a Sharp Knife: When you cut the brownies, use a sharp knife and clean it between each cut. This will ensure you have clean, precise edges that are perfect for your decorations.
- Adjust the Frosting: The consistency of your frosting is important for a clean, decorative look. If it’s too thin, you can add more powdered sugar. If it’s too thick, you can add a small dash of milk until you reach your desired consistency.
- Get Creative with Decorations: You can use any type of cookie for the “headstones” and any type of candy for the pumpkins. The fun of this recipe is in the creativity, so feel free to use what you have on hand.
- Use a Prepared Batter: Using a prepared brownie batter is a great time-saver that allows you to focus on the fun part—decorating! Just be sure to follow the package instructions for a perfect brownie base.
Graveyard Brownies Variations & Substitutions:
- A Different Frosting: You can easily substitute the buttercream with a classic cream cheese frosting or a simple powdered sugar glaze. The brownies will still be delicious with a different topping.
- Add a Nutty Crunch: For an added crunch and nutty flavor, you can mix a half-cup of finely chopped walnuts or pecans into the brownie batter. The nuts will pair perfectly with the rich chocolate and creamy frosting.
- A Different Cookie: You can use any type of cookie for the “headstones.” A simple vanilla wafer or a classic shortbread cookie would be a great alternative.
- A Pop of Color: For a more festive look, you can use other colors of food coloring in the frosting. A light blue or purple would be a fantastic contrast to the dark brownie and the orange pumpkins.
What to Serve with Graveyard Brownies:
These brownies are a delightful treat on their own, but they are also the perfect partner for a variety of beverages. A cold glass of milk is a classic pairing that complements the rich, chocolatey flavors of the brownie. For a spooky and fun pairing, you can serve them with a mug of warm apple cider or a spicy chai tea latte. The warm spices in the drinks will harmonize beautifully with the chocolate. For a truly decadent dessert, you can serve them alongside a scoop of vanilla bean ice cream or a generous dollop of whipped cream on top. The contrast of warm and cold is simply divine.
Graveyard Brownies FAQs:
- Can I use a from-scratch brownie recipe?
Yes, you can. This recipe is designed to be a time-saver, so a prepared brownie batter is suggested. However, you can use your favorite from-scratch brownie recipe. Just be sure to bake them in an 8-inch pan and let them cool completely before decorating. - What kind of cookies can I use for the headstones?
You can use any type of cookie that is flat and has a rectangular shape. A simple vanilla wafer or a classic shortbread cookie would work perfectly. You can also use a small butter cookie for a more subtle headstone. - How do I make a thick frosting?
To make a thick frosting, you should use cold butter and cream cheese. You can also add a little more powdered sugar until you reach your desired consistency. If the frosting is too thin, you can add a tablespoon or two more of powdered sugar. - Can I make the frosting ahead of time?
Yes, you can. The buttercream can be made a day in advance and stored in an airtight container in the refrigerator. Just be sure to let it come to room temperature and give it a quick whip before you use it. - What kind of decorating gel should I use?
You should use a black decorating gel that is specifically designed for writing on cookies and cakes. This will ensure that the “R.I.P.” on the headstones is clean and precise. You can find decorating gel at any major grocery store.
Graveyard Halloween Brownies Recipe
Ingredients
For the Brownies
- Prepared brownie batter for an 8-inch pan
For the Green Buttercream Frosting
- 1 cup powdered sugar
- 1/4 cup butter softened
- 2 teaspoons milk
- A few drops green food coloring
For the Decorations
- 12 long rectangular chocolate-filled cookies
- Black decorating gel
- 12 candy pumpkins
Instructions
- Bake Brownies: Line an 8-inch pan with parchment paper. Pour in batter and bake according to recipe instructions. Cool completely.
- Make Frosting: Mix all frosting ingredients for 2 minutes until light and fluffy.
- Decorate: Cut cooled brownies into 12 rectangles. Write “R.I.P.” on cookies with decorating gel. Press a cookie into each brownie, then add a dollop of green frosting and a candy pumpkin.