
Decadent Homemade Brownies: The Ultimate Guide to Crafting the Perfect Treat
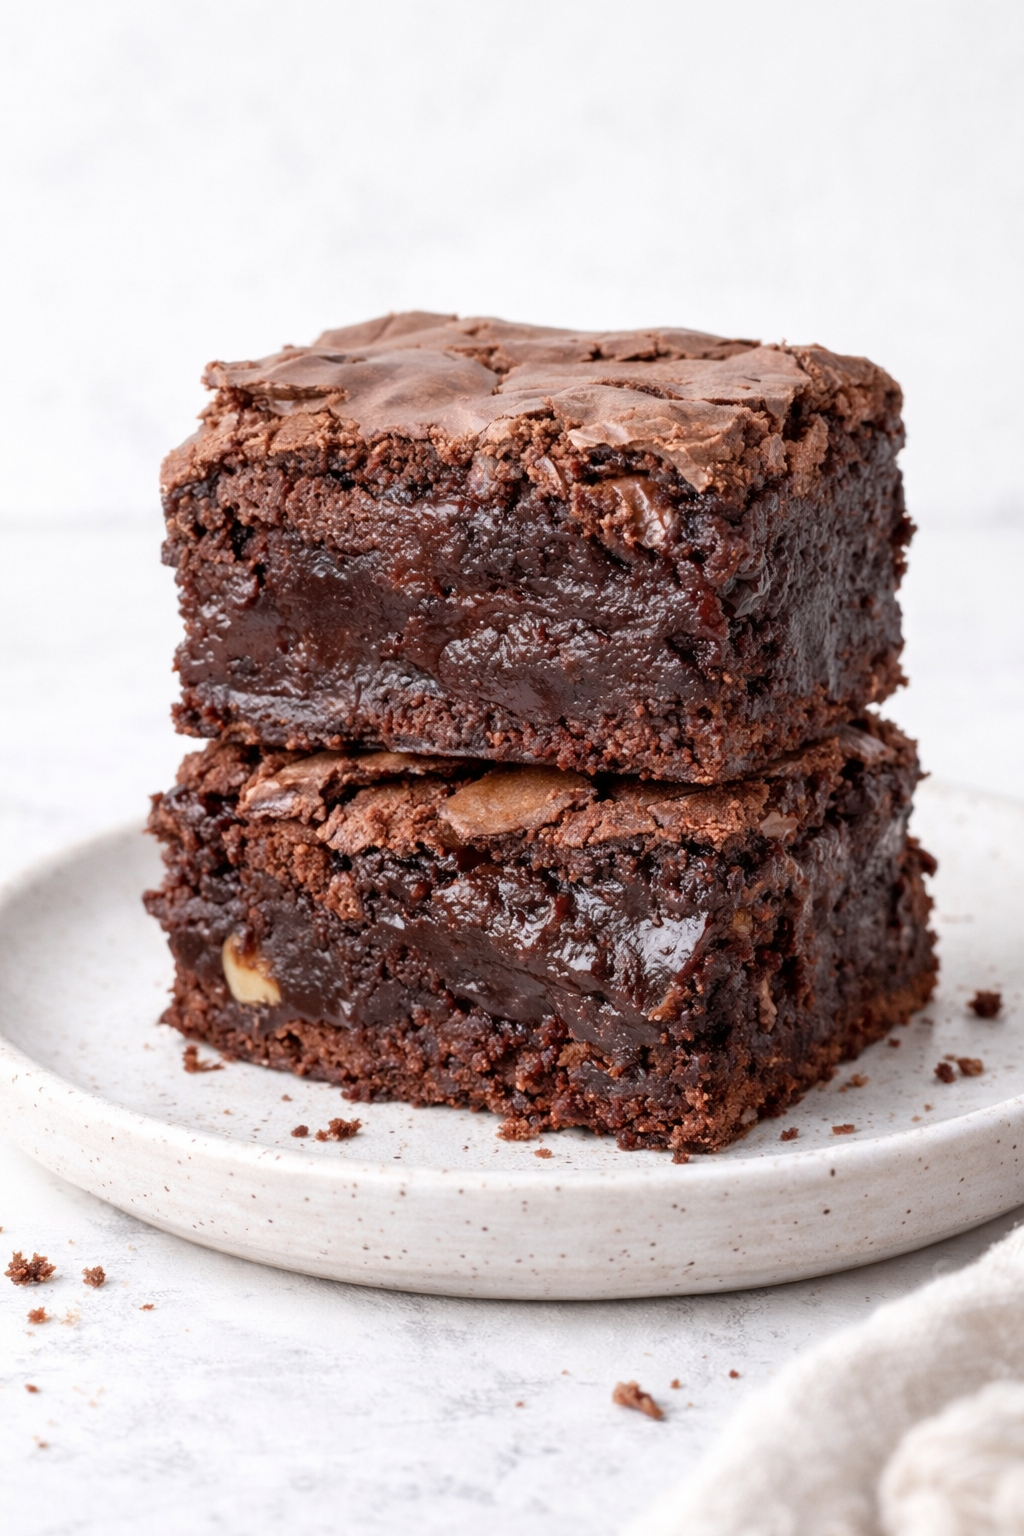
There is a universal pursuit in the world of baking that often leads to heated debates: the quest for the perfect brownie. While some prefer a cake-like crumb and others lean toward a chewy edge, the true gold standard for many is a brownie that is decadently rich, featuring a paper-thin, crackly top and an interior so fudgy it’s almost molten.
This recipe is designed to deliver exactly that. By balancing the bitterness of unsweetened cocoa powder with a specific ratio of whole eggs and extra yolks, we create a dessert that provides a complex depth of flavor and a luxurious “gooey” texture. Topped with toasted walnuts for a rustic crunch and hand-chopped semi-sweet chocolate for pockets of melted bliss, these are not just brownies—they are a chocolate lover’s masterclass.
The Science of the “Gooey” Brownie
Achieving that coveted fudge-like center isn’t just luck; it’s a matter of ingredient ratios and mixing techniques. Most brownie recipes fail because they rely too heavily on flour, which leads to a bready, cakey texture. In this guide, we use 1 1/2 cups of all-purpose flour against 2 cups of sugar and 3/4 cup of butter. This high sugar-to-flour ratio is what creates the dense, moist crumb.
Furthermore, the “secret weapon” in this recipe is the addition of an extra egg yolk. While whole eggs provide structure and lift, the extra yolk adds fat and lecithin, which interferes with the development of a cakey crumb. This results in a “shorter,” more indulgent texture. Additionally, the crackly, meringue-like top is achieved by beating the eggs and sugar together until they are pale and aerated before adding the other ingredients. This process dissolves the sugar and creates a thin layer of foam that rises to the top during baking, drying out into that signature “parchment” crust.
Detailed Ingredient Breakdown
To reach a professional level of flavor, every component must be chosen with intention.
The Sweet and The Fat
- 2 Cups of Sugar: Beyond sweetness, sugar is a liquid ingredient once it melts in the oven. It is the primary factor in creating a soft, fudgy center.
- 3/4 Cup Salted Butter (Melted): We use melted butter rather than creamed butter to keep the brownies dense. Salted butter is preferred here because salt is the ultimate foil to rich cocoa, intensifying the chocolate notes.
- 1 1/2 tsp Vanilla Extract: Vanilla acts as a “background singer” that makes the chocolate taste more rounded and less one-dimensional.
The Chocolate Profile
- 3/4 Cup Unsweetened Cocoa Powder: This provides the backbone of the flavor. Since we aren’t using melted chocolate in the batter, the cocoa provides a concentrated, dark intensity.
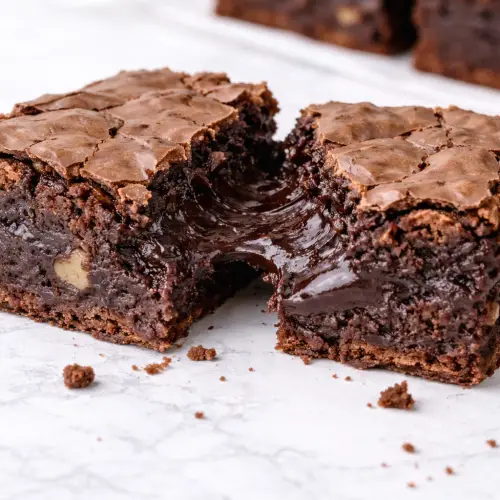
- 1/2 Cup Semi-Sweet Chocolate (Chopped): Using a hand-chopped bar rather than chips is a “pro” move. Chips contain stabilizers that help them hold their shape; a chopped bar will melt into puddles of chocolate that ripple through the dough.
Texture and Structure
- 1 1/2 Cups All-Purpose Flour: Just enough to hold the brownies together.
- 3 Whole Eggs + 1 Egg Yolk: The extra yolk provides the richness that separates a “good” brownie from a “heavenly” one.
- 1/2 Cup Toasted Walnuts: Toasting your walnuts for 5–8 minutes before adding them to the batter is essential. It releases the natural oils and removes any bitterness, providing a savory, earthy contrast to the sugar.
Step-by-Step: Mastering the Bake
1. The Aeration Stage
Preheat your oven to 350°F (177°C). Lining your 8″x8″ metal pan with parchment paper is vital; leave an overhang on two sides so you can lift the entire block out once cooled.
Using an electric mixer, beat the sugar and eggs for about 3–5 minutes. You are looking for the “ribbon stage,” where the mixture is pale yellow and thick. This is the only time you should use high speed; once this is done, the rest of the work should be gentle to avoid incorporating too much air.
2. The Gentle Fold
Stir in the vanilla, then sift in your flour and cocoa powder. Do not use the electric mixer here. Use a hand whisk or a spatula to fold the dry ingredients into the egg mixture. Folding preserves the air you just whipped into the eggs but prevents the gluten in the flour from getting “tough.”
3. Incorporating the Fat and Mix-ins
Pour in the melted butter and stir until just incorporated. You will see the batter transform from a dull brown to a glossy, dark mahogany. Finally, fold in your toasted walnuts and chocolate chunks.
4. The Critical Bake Time
Pour the batter into the pan and smooth the top. Bake for 25–35 minutes.
The Toothpick Test Myth: For brownies, you do not want a toothpick to come out clean. If it comes out clean, you have a cake. You want the toothpick to come out with a few moist crumbs attached. The edges should be firm and starting to pull away from the sides of the pan, but the center should still have a slight “jiggle” when the pan is shaken.
Frequently Asked Questions (Q&A)
Why did my brownies come out dry? This is almost always due to overbaking. Brownies continue to cook in the hot pan for several minutes after they are removed from the oven (carry-over cooking). Pull them out when they still look slightly underdone in the center.
Can I use a glass pan instead of a metal one? Glass retains heat much longer than metal. If you use glass, lower the oven temperature by 25°F and keep a close eye on them, as the edges may overcook before the middle is set.
How do I get clean slices? The “secret” to those perfectly square bakery slices is patience. Let the brownies cool completely in the pan, then refrigerate them for 1 hour. Lift them out using the parchment paper and slice with a large, sharp knife, wiping the blade clean with a damp cloth between every single cut.
Can I make these nut-free? Absolutely. Simply omit the walnuts. You can replace them with extra chocolate chunks, dried cherries, or even crushed pretzels for a salty-sweet twist.
Decoration and Serving Suggestions
To turn these brownies into a sophisticated dessert:
- The “Flaky Salt” Finish: Sprinkle a pinch of Maldon sea salt over the top as soon as they come out of the oven. This balances the 2 cups of sugar perfectly.
- The A La Mode: Serve a warm square with a scoop of high-quality vanilla bean ice cream. The cold cream melting into the warm, gooey center is a classic for a reason.
- The Caramel Drizzle: Warm up a bit of salted caramel and drizzle it in thin lines across the top for an extra layer of decadence.
Decadent Fudgy Walnut & Chocolate Chunk Brownies
Ingredients
- 2 cups Granulated sugar
- 3 Large eggs + 1 egg yolk
- 1 1/2 cups All-purpose flour
- 3/4 cup Unsweetened cocoa powder
- 3/4 cup Salted butter melted
- 1 1/2 tsp Vanilla extract
- 1/2 cup Walnuts toasted and chopped
- 1/2 cup Semi-sweet chocolate hand-chopped
Instructions
- Prep: Preheat oven to 350°F (177°C). Line an 8×8-inch metal pan with parchment paper.
- Beat: Use an electric mixer to beat sugar and eggs until light, pale yellow, and thick (approx. 3–5 mins).
- Flavor: Stir in the vanilla extract.
- Fold: Using a hand whisk, gently fold in the flour and cocoa powder. Do not overmix.
- Butter: Stir in the melted butter until the batter is glossy and combined.
- Mix-ins: Fold in the toasted walnuts and chopped chocolate chunks with a spatula.
- Bake: Pour into the pan and bake for 25–35 minutes. The center should still be slightly soft.
- Cool: Allow to cool in the pan for at least 20 minutes before lifting out to slice.
Notes
- Toasting Nuts: Toast walnuts in a dry pan over medium heat for 5 minutes until fragrant for the best flavor.
- The “Jiggle”: If the center of the pan ripples like liquid, it needs 5 more minutes. If it moves slightly as one mass, it’s perfect.
- Storage: Store in an airtight container for up to 4 days or freeze for up to 3 months.