Frozen Yogurt Granola Cups with Berries: A Refreshing and Healthy Treat
In the realm of modern snacking, the most successful recipes are those that bridge the gap between “indulgent dessert” and “functional fuel.” Frozen Yogurt Granola Cups are the perfect example of this harmony. By combining the fiber-rich structure of oats, the healthy fats of almond butter, and the probiotic-heavy creaminess of Greek yogurt, you create a treat that is as beneficial for your gut health as it is satisfying for your sweet tooth.
These cups are designed for versatility. They function beautifully as a grab-and-go breakfast for busy professionals, a high-protein post-workout recovery snack, or a sophisticated, light dessert for a summer gathering. Because they are stored in the freezer, they offer a refreshing chill that makes them a seasonal favorite during the warmer months. This guide will explore the technical nuances of creating the perfect frozen cup—one that is firm enough to hold its shape but tender enough to bite into without effort.
The Science of the Frozen Granola Base
Creating a base for a frozen treat requires a different approach than baking a standard granola bar. In a baked bar, eggs or gluten-heavy flours provide the structure. In a no-bake frozen cup, we rely on lipid-based binding.
The almond butter and honey in this recipe act as the primary structural adhesive. At room temperature, these ingredients are viscous and sticky. However, once placed in the freezer, the fats in the almond butter and the sugars in the honey undergo a phase change, transitioning into a solid state. This “locks” the oats into a rigid, crunchy matrix. By pressing the mixture firmly into the muffin liners, you eliminate air pockets, ensuring that the base won’t crumble when you peel away the paper.
Detailed Ingredient Breakdown
To achieve the perfect balance of flavor and macro-nutrients, the quality and type of ingredients you choose are paramount.
The Granola Foundation
- 3/4 Cup Oats: For this recipe, Rolled Oats (old-fashioned) are preferred over quick-cook oats. Rolled oats provide a heartier texture and more structural integrity, which is essential when they are being used as a “crust.”
- 1/4 Cup Almond Butter: This provides the healthy monounsaturated fats and a nutty depth. For the best consistency, use a “natural” almond butter that is runny enough to mix easily with the dry oats.
- 3–4 tbsp Honey: Honey serves as our natural sweetener and secondary binder. If you are making a vegan version, you can substitute this with 100% pure maple syrup or agave nectar.
- 1/2 tsp Cinnamon & 1 tsp Vanilla: These are the “aromatics.” They provide the nostalgic flavor profile of an oatmeal cookie, making the healthy base feel like a treat.
The Creamy Core
- 1 1/2 Cups Greek Yogurt: Greek yogurt is the gold standard for frozen cups because of its high protein content and low moisture. Regular yogurt has a higher water-to-protein ratio, which can result in “icy” or crystalline textures when frozen. The thick, strained nature of Greek yogurt ensures a creamy “frodoyo” consistency.
- Plant-Based Alternatives: For a vegan alternative, look for a high-fat coconut or soy-based yogurt. Higher fat content in vegan yogurts helps mimic the creaminess of dairy.
The Nutrient-Dense Topping
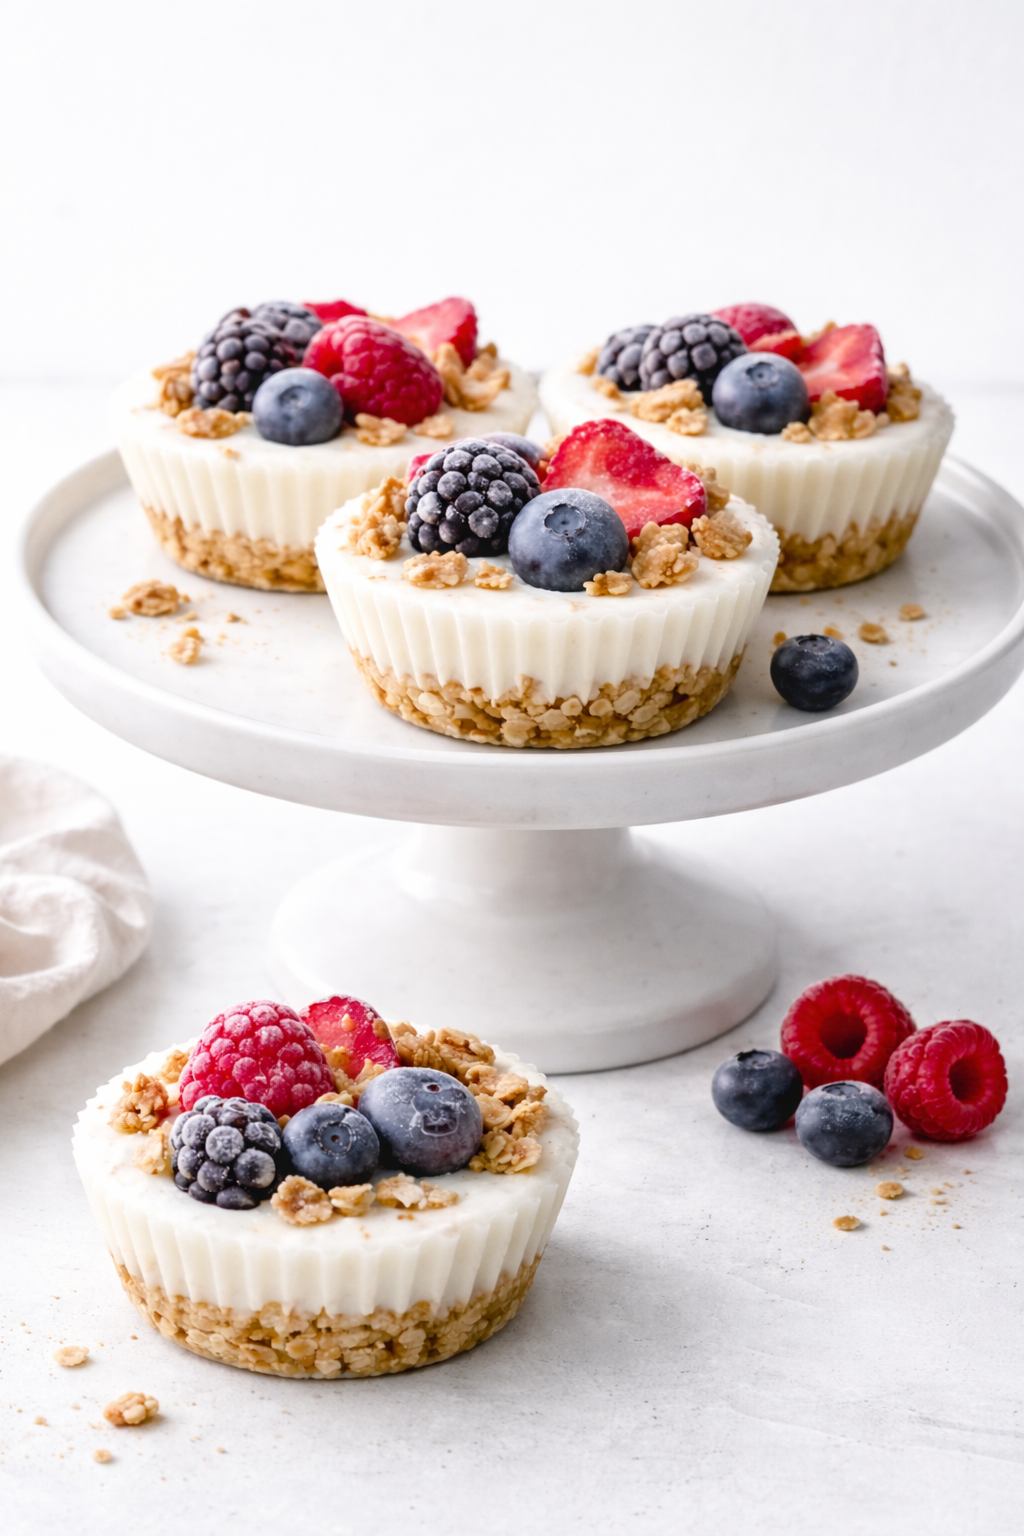
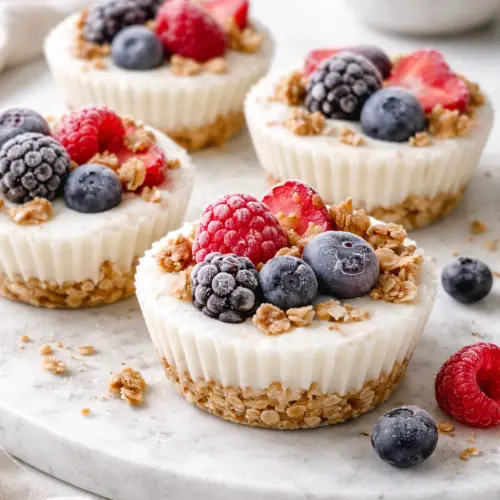
- Fresh Berries: Blueberries, raspberries, and strawberries aren’t just for color; they provide a hit of antioxidants and vitamin C. When frozen, berries take on a sorbet-like texture that complements the creaminess of the yogurt.
Step-by-Step: Perfecting the Assembly
1. Mixing the Base
In a medium bowl, combine your oats, cinnamon, almond butter, honey, and vanilla. You are looking for a “sticky dough” consistency. A common pitfall here is a mixture that is too dry—if the oats are still loose and falling apart, add one extra teaspoon of almond butter. The mixture should hold together when you pinch it between your fingers.
2. The Pressing Technique
Line a standard 12-cup muffin pan with paper or silicone liners. Spoon the granola mixture into the bottom of each. Pro Tip: Use the back of a small spoon or a clean thumb to press the mixture down with significant force. You want to create a flat, compacted disc. This compaction is what prevents the cup from falling apart when it hits room temperature.
3. Layering and Filling
Add a generous spoonful of Greek yogurt to each cup, smoothing it out with the back of a spoon. You want to leave about a quarter-inch of space at the top of the liner to accommodate the berries.
4. Garnishing and the “Flash Freeze”
Press your chosen berries into the top of the yogurt. For a professional look, vary the colors—one blueberry, one raspberry, and a small slice of strawberry on each. Place the pan in the freezer for at least 4 hours. If you plan on eating them throughout the week, you can transfer the frozen cups into a zip-top bag once they are fully set.
Frequently Asked Questions (Q&A)
How do I keep the yogurt from getting too icy? The “iciness” is caused by water crystals. To prevent this, use the thickest Greek yogurt you can find (5% or 10% fat versions work best). If your yogurt seems watery, you can strain it through a coffee filter for 30 minutes before using it to remove excess whey.
Can I use different nut butters? Absolutely. Peanut butter offers a more dominant flavor that pairs perfectly with chocolate chips, while cashew butter provides a very mild, creamy profile that allows the lemon or vanilla notes to shine.
How long do these last in the freezer? When stored in an airtight container or a heavy-duty freezer bag, these cups will remain fresh for up to 1 month. Beyond that, the berries may begin to develop freezer burn.
Why do I need to let them thaw before eating? Straight from the freezer, the honey-and-oat base can be quite hard. Letting the cups sit at room temperature for 3–5 minutes allows the fats in the almond butter to soften just enough to give the cup a “chewy” rather than “icy” bite.
Decoration and Serving Tips
To elevate these cups for guests or a special brunch:
- The Honey Drizzle: Just before serving, drizzle a tiny amount of honey over the frozen berries. It will thicken instantly, creating a beautiful amber gloss.
- Textural Contrast: Sprinkle a few hemp hearts, chia seeds, or toasted pepitas on top for an added layer of crunch and an extra boost of Omega-3s.
- Coconut Snow: A light sprinkle of unsweetened shredded coconut over the top provides a “snowy” aesthetic that looks stunning against the deep reds and blues of the berries.
Frozen Yogurt Granola Power Cups
Ingredients
- 3/4 cup Rolled oats
- 1/4 cup Natural almond butter
- 3 –4 tbsp Honey or maple syrup
- 1 tsp Vanilla extract
- 1/2 tsp Ground cinnamon
- 1 1/2 cups Greek yogurt full-fat recommended
- 1 cup Mixed fresh berries strawberries, blueberries, raspberries
Instructions
- Base: In a bowl, mix oats, cinnamon, almond butter, honey, and vanilla until a sticky dough forms.
- Line: Place 12 liners in a muffin tin.
- Press: Distribute the granola mixture evenly across the liners and press down firmly to create a solid base.
- Fill: Top the granola with a generous dollop of Greek yogurt (about 2 tablespoons per cup).
- Top: Press fresh berries into the yogurt and add any remaining granola crumbles.
- Freeze: Freeze for a minimum of 4 hours until the yogurt is solid.
- Serve: Remove from the freezer and let sit for 3–5 minutes before peeling off the liner.
Notes
- Customization: Add a few mini dark chocolate chips to the granola base for a more dessert-like experience.
- Vegan Option: Use coconut-based yogurt and maple syrup for a 100% plant-based version.
- Consistency: If your almond butter is very stiff, microwave it for 10 seconds to make it easier to incorporate into the oats.