The Easiest 3-Ingredient Mango Ice Pops (Vegan & Refreshing)
When the sun is beating down and the humidity is at an all-time high, the last thing anyone wants is a heavy dessert. We want something cold, something bright, and something that doesn’t require turning on the oven. Enter: these 3-Ingredient Mango Ice Pops. They are essentially a tropical vacation on a stick, and because they’re made with nothing but real fruit and a hint of natural sweetness, you can feel good about grabbing a second one.
Most store-bought fruit bars are essentially frozen sugar water with a tiny hint of fruit juice. These are the exact opposite. By using a high-speed blender, we turn whole mangoes into a thick, velvety purée that freezes into a texture closer to premium sorbet than a hard ice cube. It’s a trick that makes these feel incredibly indulgent while remaining totally vegan and dairy-free. Let’s get these into your freezer before the next heatwave hits!
Why You’ll Obsess Over These Mango Pops
- Texture is King: Unlike water-based popsicles that can be grainy or icy, the natural fiber in mangoes creates a smooth, creamy “bite” that is totally addictive.
- Minimalist Prep: If you have five minutes and a blender, you’re basically done. The hardest part is waiting for them to freeze!
- Zero Hidden Junk: No dyes, no high-fructose corn syrup, and no “natural flavors”—just fruit, lime, and a splash of maple.
- Kid-Approved: These are a massive hit with toddlers and teens alike, making them a secret weapon for healthy summer snacking.
- The Ultimate Base: This recipe is a canvas. You can keep it simple or use my tips below to turn them into spicy Mexican-style treats or creamy coconut swirls.
What’s in the Blender?
The Star of the Show: Mangoes
You want about 6 cups of fruit. If you have access to fresh, ripe mangoes (the ones that smell sweet through the skin), use those! If not, a big bag of frozen mango chunks works perfectly and saves you the hassle of peeling and pitting.
The Brightener: Fresh Lime
Don’t skip the lime! It does more than just add a zingy flavor; the acidity actually helps keep the mango color vibrant and prevents the pops from tasting “flat.” It wakes up the whole recipe.
The Sweetener: Maple Syrup
Since we aren’t using refined sugar, a splash of maple syrup (or agave) provides a nice, rounded sweetness. If your mangoes are incredibly ripe and sweet on their own, you can actually cut the sweetener in half—or leave it out entirely!
The Texture Secret: A Splash of Water
We only use enough water to get the blender moving. We want a thick, pourable consistency, not a thin juice. The thicker the purée, the creamier the finished pop will be.
How to Make Them: Step-by-Step
Step 1: Get Your Fruit Ready
If using fresh mangoes, slice them into chunks, discarding the pit and skin. If you’re using frozen, let them sit on the counter for about ten minutes. You don’t want them fully thawed, but letting them soften just a little makes it easier for your blender to create that perfectly smooth texture without needing too much extra water.
Step 2: The Big Blend
Throw your mango, lime juice, and maple syrup into the blender. Add a small splash of water to start. Flip the switch and let it run until you see a “vortex” form. If the fruit is just spinning around without breaking down, add another tablespoon of water. You are looking for a thick, velvety mixture that looks like a high-end smoothie.
Step 3: The Taste Test
Always taste your purée before pouring! Cold dulls the sensation of sweetness, so if the mixture tastes “just okay” now, it might be a bit bland once frozen. If it needs more punch, add another squeeze of lime. If it needs more sweetness, add a touch more maple.
Step 4: Fill and Tap
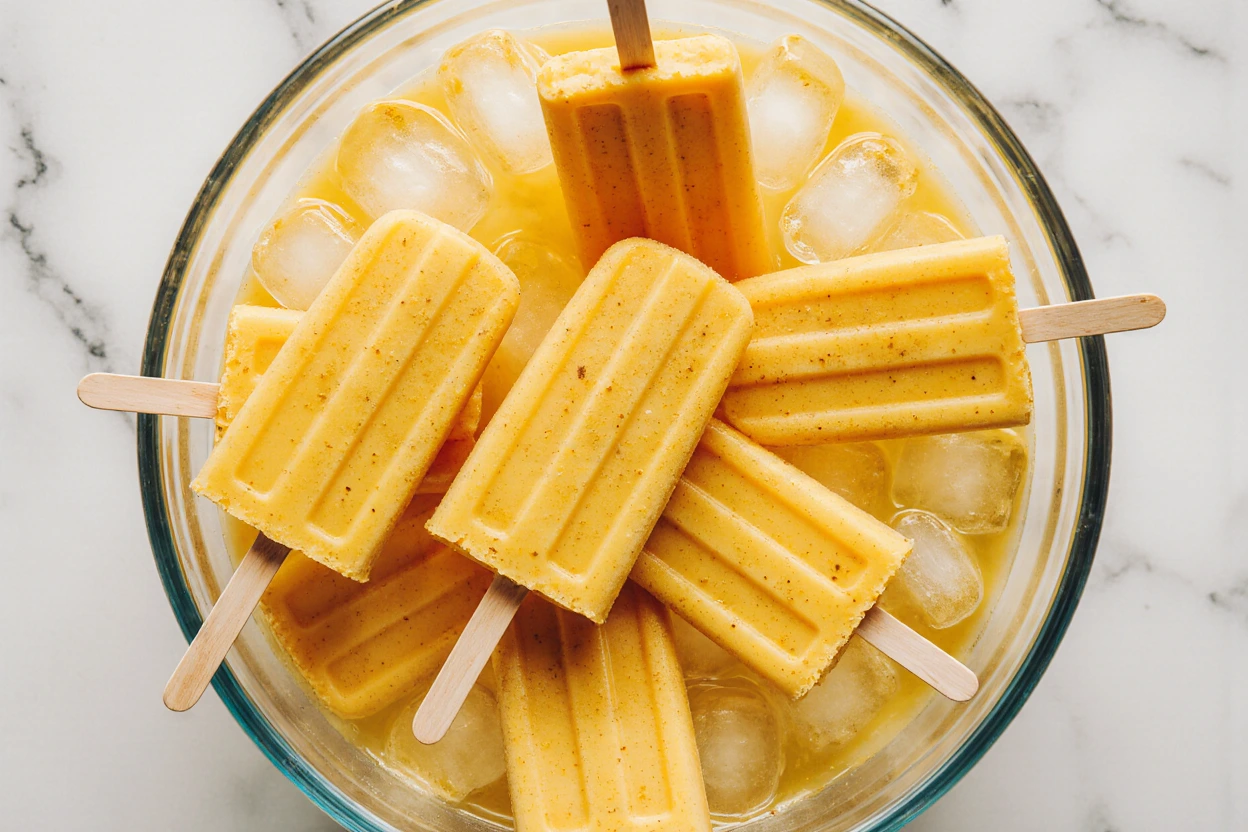
Pour the mixture into your molds. Here’s a pro-tip: leave about a half-inch of “breathing room” at the top. Liquid expands as it freezes, and if you fill them to the brim, you’ll have a sticky mess and lids that won’t budge. Once filled, give the molds a firm tap on the counter to settle any air bubbles.
Step 5: The Long Chill
Place your sticks in and get them into the back of the freezer—that’s usually the coldest spot. Give them at least 6 hours. I usually make these in the evening so they are perfectly set for the following afternoon.
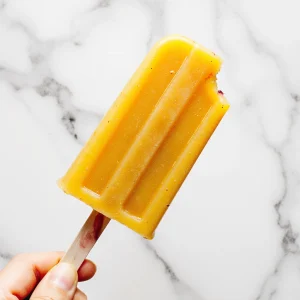
Step 6: How to Unmold Like a Pro
When you’re ready to eat, don’t just yank on the stick. Run the outside of the mold under lukewarm water for about 10–15 seconds. This melts the very outer edge of the pop, allowing it to slide out perfectly without breaking.
Make it Your Own: Fun Variations
- The Spicy Kick: If you love a salty-spicy combo, sprinkle some chili-lime seasoning (like Tajín) into the bottom of the mold before you pour in the mango. It’s a classic street-food flavor that is incredible when frozen.
- Coconut Dream: Fill your molds halfway with the mango mix, then top off with a splash of full-fat canned coconut milk for a “Mango Lassi” style treat.
- Hidden Greens: If you’re trying to sneak some veggies into your kids’ snacks, you can actually blend in a handful of baby spinach. The mango flavor is so strong you won’t taste the greens, though the pops will turn a fun bright green color!
- Layered Fruit: Drop a few whole raspberries or small pieces of kiwi into the mold before freezing for a beautiful, multi-colored look.
Storage & Freshness
These popsicles are best enjoyed within about 2 to 3 weeks. After that, they can start to develop ice crystals (freezer burn), especially if your freezer gets opened and closed a lot. If you want to store them longer, unmold them once frozen and wrap each one individually in parchment paper, then store them all in a large freezer-safe zip-top bag.
Troubleshooting & Tips
- My pops are too hard: This usually means there was too much water and not enough fruit solids. Next time, try adding a little more mango or a tablespoon of coconut cream to the mix.
- The sticks won’t stay straight: If your mold doesn’t have a lid to hold the sticks, let the pops freeze for about an hour until they are “slushy,” then insert the sticks. They’ll stay perfectly upright!
- They won’t come out of the mold: Be patient with the warm water trick. 15 seconds is usually enough. If you pull too hard, you’ll just pull the stick out and leave the delicious popsicle behind!
Refreshing 3-Ingredient Mango Ice Pops
Ingredients
- 6 cups Mango chunks Fresh or slightly thawed from frozen
- 2 tbsp Fresh lime juice
- 1/2 cup Maple syrup adjust based on the sweetness of your fruit
- 1/3 cup Water only as needed for blending
Instructions
- Combine: Place the mango chunks, lime juice, and maple syrup into a high-speed blender or food processor.
- Blend: Add about half of the water and blend on high until the mixture is perfectly smooth. If the blender is struggling, add the remaining water one tablespoon at a time. The mixture should be thick but pourable.
- Adjust: Taste the mixture. If it needs more brightness, add a little more lime. If it’s not sweet enough, add another splash of maple syrup.
- Fill: Pour the purée into your ice pop molds, leaving about a half-inch of space at the top to allow for expansion.
- Set: Place the lid on the molds and insert the wooden sticks.
- Freeze: Place the molds in the freezer for at least 6 hours, or ideally overnight.
- Serve: To remove, run the molds under warm water for 10–15 seconds until the popsicles loosen. Gently pull the sticks and serve immediately.
Notes
- Mango Selection: If using fresh mangoes, look for ones that are soft to the touch. The sweeter the fruit, the better the popsicle!
- Sweetener: You can substitute the maple syrup with agave nectar or simple syrup if preferred.
- Consistency: If you want a more “creamy” popsicle, replace the water with canned coconut milk.