
Tiramisu Chocolate Layer Cake
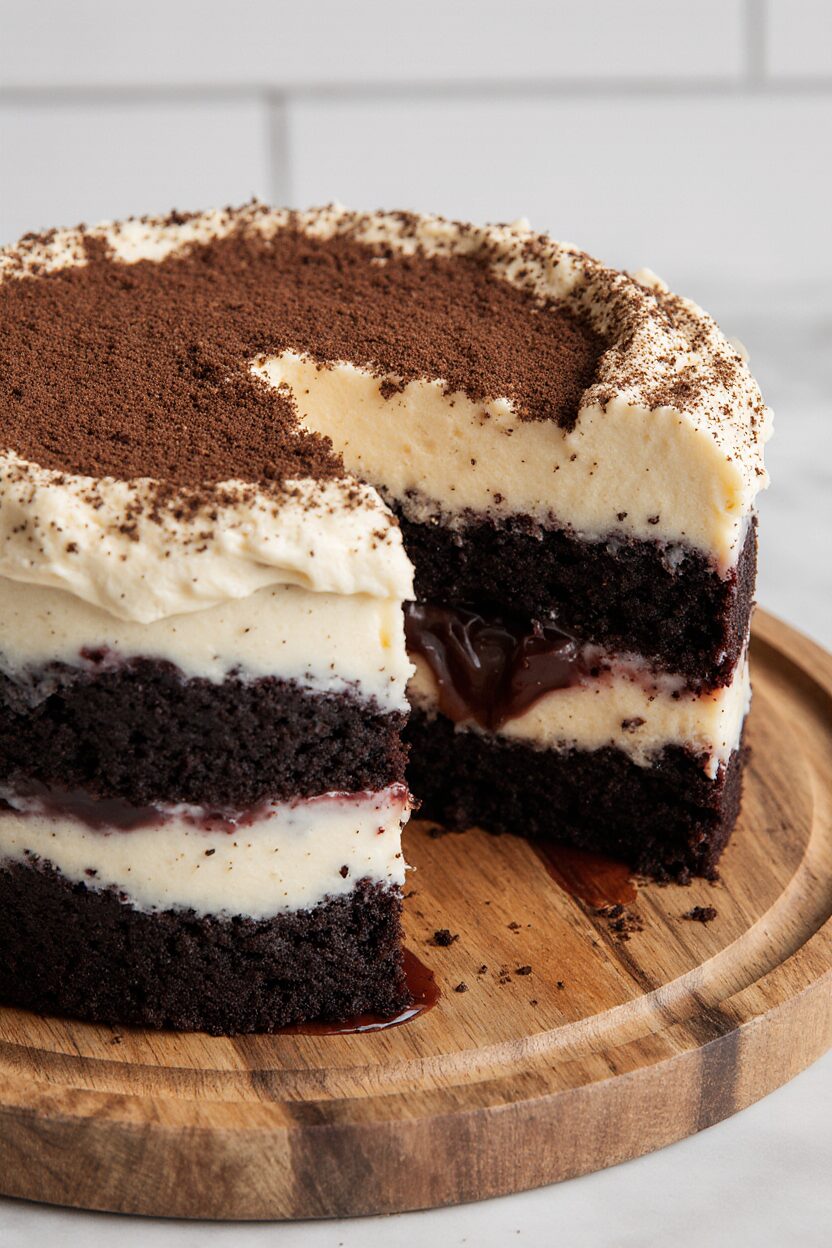
This Tiramisu Chocolate Layer Cake brings together the best of two worlds—deep, fudgy chocolate cake layers and the creamy, coffee-rich flavors of classic tiramisu. Every bite is a blend of bold cocoa, subtle espresso, silky ganache, and whipped mascarpone cream. If you’re a fan of layered cakes that feel indulgent and elegant, this one will absolutely blow you away. It’s rich but balanced, moist yet fluffy, and sophisticated without being fussy.
Why You’ll Love This Recipe
- Perfect for special occasions: This cake is showstopping, with tall layers, contrast in textures, and refined flavors that taste like something you’d find in a patisserie.
- Coffee lovers’ dream: The coffee milk soak and espresso mascarpone cream add depth and complexity to every forkful.
- Deep chocolate richness: Cocoa, brown sugar, buttermilk, and brewed coffee make the chocolate cake intense but soft and tender.
- No compromise on moisture: The coffee milk soak ensures the cake stays rich and moist, even days later.
Ingredients
For the Chocolate Cake
- 1 ¾ cups plain flour
- 2 tsp baking soda
- 2 tsp baking powder
- Pinch of salt
- ½ cup vegetable oil
- 1 cup buttermilk
- 1 cup boiling water
- 2 tsp instant coffee
- 1 tbsp vanilla bean paste
- 2 eggs
- ¾ cup cocoa powder
- 1 cup caster sugar
- ¾ cup brown sugar
For the Coffee Milk Soak
- 1 ½ cups milk
- 1 cup caster sugar
- 2 tsp instant coffee powder
For the Chocolate Ganache
- 325g dark chocolate
- 1 ¼ cups thickened cream
For the Espresso Mascarpone Cream
- 3 tsp vanilla bean paste
- 60ml cooled brewed coffee
- 250g mascarpone
- 500ml thickened cream
- ½ cup icing sugar
To Decorate
- Cocoa powder (optional, for dusting)
Step-by-Step Instructions
Step 1: Make the Chocolate Ganache
Start with the ganache so it has time to cool and thicken. In a saucepan, gently heat the thickened cream until it just begins to steam. Do not let it boil. Pour the hot cream over finely chopped dark chocolate in a heatproof bowl. Let sit undisturbed for 10 minutes to melt. Stir slowly until smooth and glossy. Cover and refrigerate for at least 4 hours to firm up.
Step 2: Bake the Chocolate Cakes
Preheat your oven to 180°C (350°F). Grease and line two 23 cm (9-inch) round cake pans.
In a large bowl, sift the flour, cocoa powder, baking soda, baking powder, and salt. Stir to combine.
In a separate large bowl or stand mixer, whisk the eggs, oil, vanilla bean paste, caster sugar, brown sugar, and buttermilk until smooth and slightly pale.
Dissolve the instant coffee in the boiling water and set aside.
Gradually mix the dry ingredients into the wet mixture in two parts. Once combined, slowly add the coffee mixture, mixing until the batter is smooth and lump-free.
Divide the batter evenly between the two prepared cake pans. Bake for 30 minutes or until a skewer inserted into the center comes out clean. Let cakes cool in pans for 10 minutes before transferring to a wire rack.
Step 3: Make the Coffee Milk Soak
While the cakes are still warm, prepare the soak. In a saucepan, combine milk, caster sugar, and instant coffee powder. Heat gently, stirring, until sugar dissolves and the mixture begins to steam.
Poke holes in the warm cakes using a skewer or fork. Pour the coffee soak evenly over both cake layers, allowing it to absorb slowly. This adds incredible moisture and classic tiramisu flavor. Let the cakes cool completely before assembling.
Step 4: Prepare the Espresso Mascarpone Cream
In a stand mixer fitted with the whisk attachment, combine thickened cream, mascarpone, vanilla bean paste, and icing sugar. Beat on high speed until thick, fluffy, and stiff peaks form.
Add the cooled coffee and whip again until fully combined. Be careful not to over-whip after the coffee is added, or the mixture can split.
Step 5: Assemble the Cake
Place one cooled cake layer on a serving board or cake stand. Spread half of the chilled ganache evenly across the surface.
Top with the second cake layer. Use an offset spatula to cover the entire cake with the espresso mascarpone cream, smoothing the sides and top for a clean finish.
Decorate the top with piped swirls of cream around the edge using a star tip. Spoon the remaining ganache into the center to create a beautiful contrast of dark chocolate and light cream.
Dust lightly with cocoa powder to complete the tiramisu look.
Baking and Assembly Tips
- Use room temperature ingredients: Especially the mascarpone and cream. This ensures smooth mixing and stable whipped cream.
- Don’t skip the soak: It’s what makes this cake reminiscent of tiramisu. The milk soak ensures moistness without making the cake soggy.
- Chill the ganache: Warm ganache will slide right off your cake. Let it firm up to a spreadable consistency for clean layers.
- For neat slices: Chill the finished cake for an hour before serving. Use a hot knife to cut clean, precise slices.
Storage Suggestions
Since this cake includes whipped cream and mascarpone, it should be stored in the refrigerator. Keep it covered in a cake carrier or lightly wrapped with plastic wrap to prevent drying out. It will keep well for up to 3–4 days.
You can also prepare the cake layers and ganache a day in advance and store separately. Assemble the cake the next day to save time and reduce stress before serving.
Serving Suggestions
Serve slices of this tiramisu chocolate layer cake slightly chilled or at cool room temperature. It pairs beautifully with coffee, cappuccino, or espresso to enhance the dessert’s coffee-forward notes. It’s the perfect ending to a dinner party or a celebratory cake for birthdays, anniversaries, or holidays like Easter or Christmas.
Final Thoughts
This cake is everything a dessert should be—layered, flavorful, moist, and rich with texture. It brings the sophistication of tiramisu and the comfort of chocolate cake together in one dessert. With ganache, coffee milk soak, and whipped espresso mascarpone cream, every element is designed to complement the next. Whether you’re a seasoned baker or making this as your first showstopper, you’ll love how easy it is to create something this impressive from scratch.